I had never done any kind of chalk artwork ever. The last time I even touched a chalk was years ago.
But you
know how it is when you see something and you
"kinda sorta" figure out how things
are done in your head, right? It's like a good cook who tastes a dish
and can guess what the ingredients are and how it was done. Well, that's
me when it comes to art. I see
a painting,
a sculpture,
a design ...
and I "kinda
sorta" know how it's done.
So with Chalk Art all I needed was the opportunity to try out my theory.
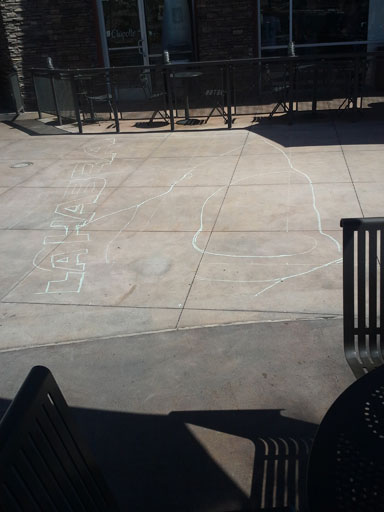
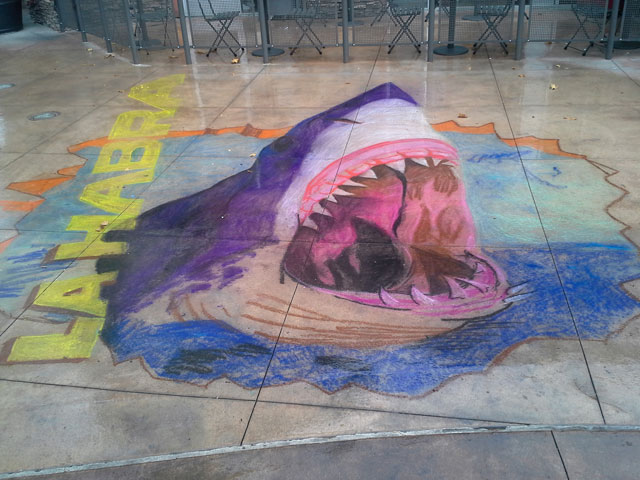
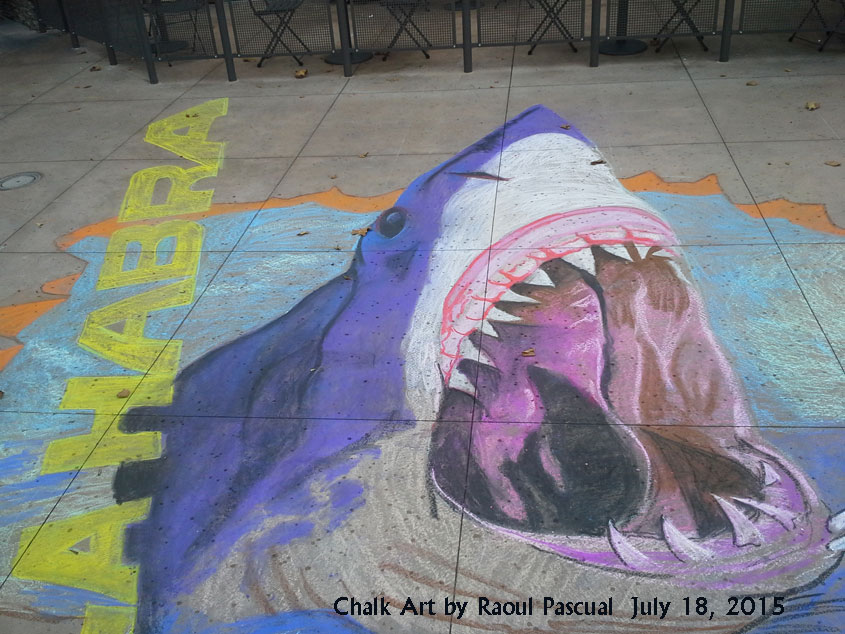
The City of La Habra held their very first Art Walk and I was tasked to create chalk art. What you see is what I came up with.
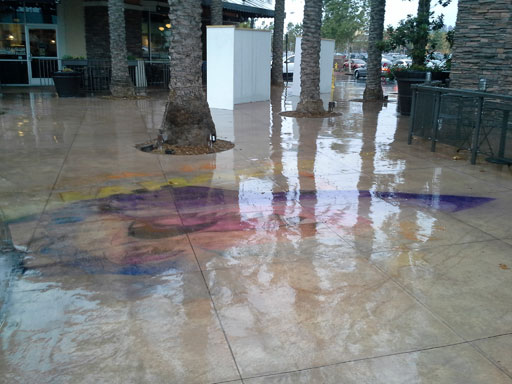
Unfortunately, before I could finish, it started to rain and that's when I gave up the experiment.
I have no regrets though. I've always wanted to do one of these and I proved I could turn my theory into reality. Now I can strive for bigger better things.
One thing I believe I can do is a marble sculpture. It's all in my head but I just don't have the tools for it. Who knows? Maybe it may yet happen.
I hope my experience
will help you create your own pavement masterpiece.
--- Raoul Pascual

Are you really interested in trying this out? Based on my experience, here is a convenient CHECKLIST:
- As many chalk colors (large and small) as you can
- gloves with a soft material that will allow rubbing
- sun glasses
- sun screen
- a hat with a large rim to protect from the sun
- a print out of the artwork with the lines. Make sure the lines are clearly drawn so make it easy to see the individual squares.
- a colored printout. Putting it in a plastic sheet will help keep it clean.
- bottled water
- a stool
- a water spray bottle
- a soft rag to wet and erase mistakes
- a soft brush
- a bristle brush or a tooth brush
- Dress down - light T-shirt, work pants or shorts. Comfy rubber shoes or sandals
- It might be a good idea to have your meal before you start because your hands will get really dirty.
Here's treat. If you want to replicate what I did, here's a PDF of the drawing.
I posted an article about this in the La Habra Business Connection website.
CLICK
HERE

|
Lessons on 3D Chalk Drawing
Do an internet search for 3D drawings and draw inspiration from other people. Don't be too ambitious. Make it easy since this will be your first piece and you need to familiarize yourself with the materials --- the chalk, the pavement, the bending and stretching, the amount of time to render a given area, the available chalk colors (not a whole range is out there). You can make this a group project where a head artist would do the outlines and the "minions" color assigned areas. Be mindful of not stepping on the art area --- so rather than jump from area to area, try to start on the top left or top right and move your way down. Take a photo of the area and make a note of where the "sweet spot" is for the photo --- the best angle to take the shot. See that frame? No need to design beyond that area in the camera because if the photographer were to move back to take the whole artwork, he won't be on the "sweet spot" and so the illustion won't work. I discovered that I needed to do a lot of rubbing because of the uneven surface of the tiles, I couldn't completely color an area so I had to do a lot of rubbing. The smoother the surface, the easier to color and the less chalk consumption. Bring a brush or a very soft cloth if you don't want to use your hands. I made a pleasant surprise ---- when it started to rain, I noticed that the drizzle helped spread the colors evenly. So next time I will bring a spray bottle to sprinkle an area.
You need to visit/check out the area. Notice where the shadows will fall during the time of day when people will be viewing it. Try to avoid tree or building shadows because that would completely ruin the illusion that you want to create. What I didn't consider was the freak weather. This is an outdoors project so you are left at the mercy of the elements. If you will need to leave the artwork overnight, you might want to cordon off the area. I noticed people unaware of their surrounding walking right on top of this. If your "canvass" is made of square tiles, that will help you measure your dimensions. Otherwise you will need to bring a T Square to get your squares right. Realize also that these tiles will not be 100% perfectly cut. Installers often cut off subtle edges to compensate for the shifting landscape. If you have a projector, you might want to try projecting and tracing the artwork. This will save you a lot of time measuring. On the day itslef, be sure to bring sun glasses, a hat and lots of water. Wear sun screen. If you have knee or back problems, you might want to try a different profession --- just kidding. Get a stool so you can sit down. You might want to wear gloves. You don't want to contaminate your cell phone or door handles with chalk marks. Knee pads are good too. Of course bring chalk in as many colors as possible. Bring long rulers, tape 2 together if one just isn't long enough. Bring a tape measure. If you have access to one of those chalk markers, that'll be really helpful. It is not crucial but it will help if you sweep the pavement first. Make sure someone else has the responsibility to clean up after you're done. You already did the hard work, no sense in doing clean up duties, right? ---- You already cooked the mean, do you still have to do the dishes? |
|
|
 This is as far as I got before the rains started to pour. The time it took to execute this (from the lining of the pavement to the coloring was about 4 hours). |
 There was this kid who watched me for several minutes. He was the only one who got to pose before my artwork was washed away by the rain. I asked him if he wanted to help me color but he chickened out. |
|
I discovered that wetting the art a bit helped close the deep crevices of the tiles. Bring a water spray bottle to do this. |
|
This is a sad sight. The rain had no respect for my artwork. But who am I to complain about Mother Nature? |
|
After half an hour, Nothing was left but a pool of colored sediments. |
|
Down the drain it goes. |
|
The glassy pavement made interesting reflections over my work. |
|
Wouldn't it be cool if a shark were to suddenly jump out of the puddle? Hope you enjoyed this lesson. |